Appearance
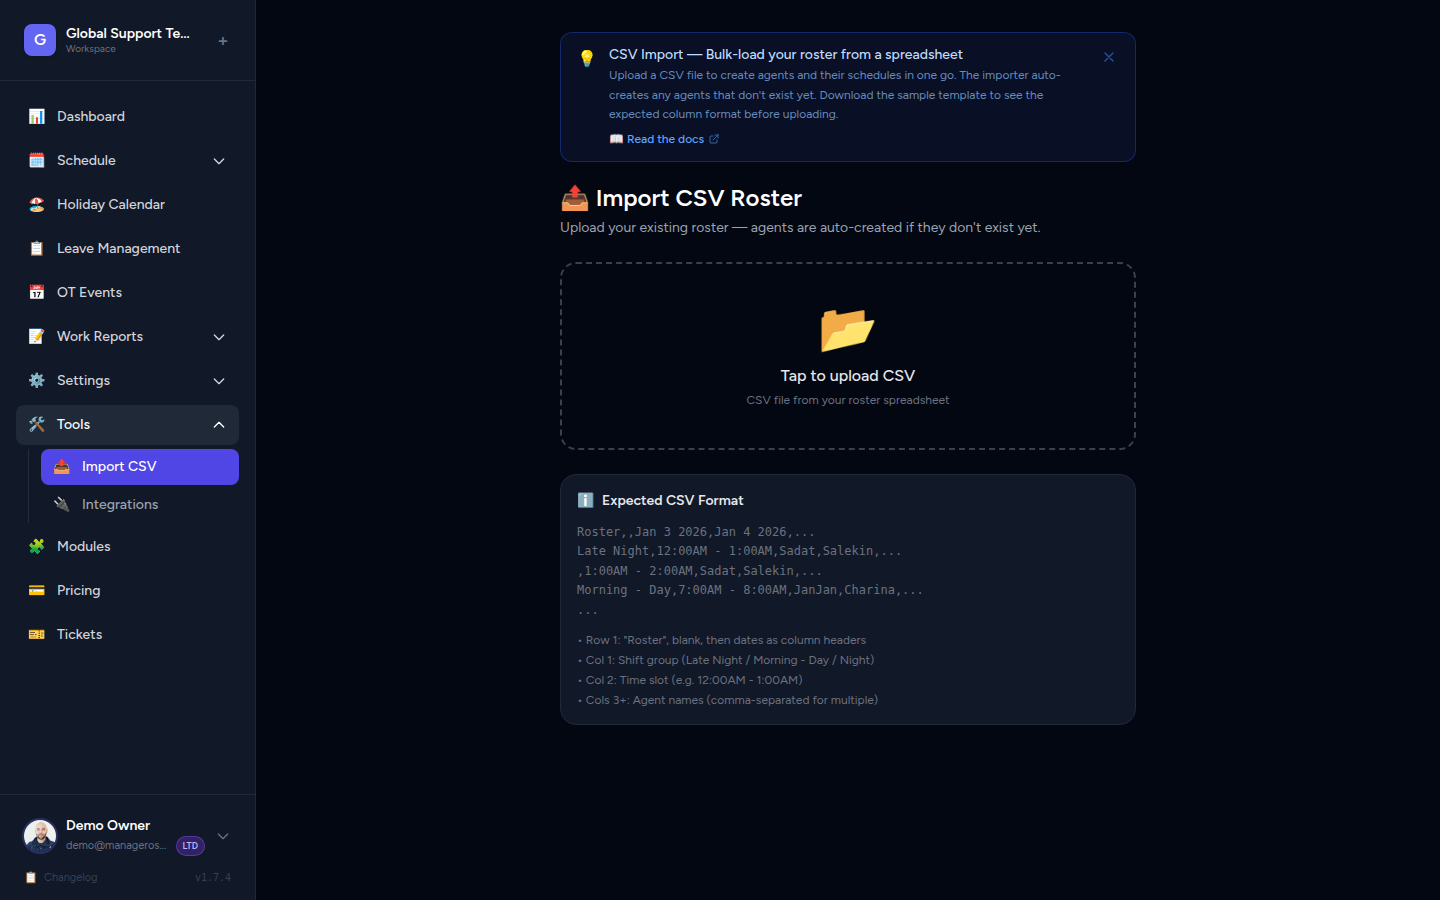
CSV Import
The CSV Import feature lets you load an entire roster in one go — no manual entry required. It's especially useful when you're getting started and already have shifts tracked in a spreadsheet, or when you need to bulk-load a multi-week roster quickly.
INFO
CSV Import is available to Owners only.
What CSV Import Is For
- Initial setup — bring your existing spreadsheet roster into Manage Roster when you first get started.
- Bulk loading — add dozens or hundreds of shifts at once instead of creating them one by one.
- Safe re-import — importing the same file twice won't create duplicate entries. The system updates existing records rather than adding extras.
WARNING
Import is additive only — it adds or updates shifts but never deletes existing schedule entries. Your current roster stays intact.
Navigating to CSV Import
- Click Settings in the left navigation.
- Select Import from the Settings menu.
- You'll land on the Import CSV Roster page.
📸 Screenshot: Settings menu with "Import" option highlighted
CSV File Format
Manage Roster uses a roster-style CSV — the same layout most support teams already use in spreadsheets. It is not a generic flat export with one row per shift; instead, rows represent time slots and columns represent dates.
Structure at a Glance
| Cell | What goes here |
|---|---|
| Row 1, Column A | The word Roster (marks this as the header row) |
| Row 1, Column B | Leave blank |
| Row 1, Columns C onwards | One date per column (e.g. Jan 3 2026 or 2026-01-03) |
| Column A (data rows) | Shift group label (e.g. Late Night, Morning - Day) — optional, for readability |
| Column B (data rows) | Time slot (e.g. 12:00AM - 1:00AM, 7:00AM - 8:00AM) |
| Columns C+ (data rows) | Agent name(s) working that slot on that date |
Sample CSV Layout
Roster,,Jan 3 2026,Jan 4 2026,Jan 5 2026
Late Night,12:00AM - 1:00AM,Sadat,Salekin,
,1:00AM - 2:00AM,Sadat,,
,2:00AM - 3:00AM,,,
Morning - Day,7:00AM - 8:00AM,JanJan,Charina,Sadat
,8:00AM - 9:00AM,JanJan,Charina,
Night,6:00PM - 7:00PM,Salekin,,JanJan
Key rules
- Time slots must be on the hour —
12:00AM,1:00AM,7:00AM, etc. Half-hour slots like1:30AMare skipped. - Multiple agents in one cell — separate names with a comma:
JanJan,Sadat. - Empty cells mean no one is assigned to that slot on that date. That's fine — just leave the cell blank.
- Shift group labels in Column A (like
Late Night) are decorative — they help you read the file but aren't used by the system.
TIP
The easiest way to get the format right is to open your existing roster spreadsheet, make sure the columns match the layout above, and export it as a .csv file.
Preparing Your File
If you're starting from scratch or converting a spreadsheet:
- Open your roster in Excel, Google Sheets, or any spreadsheet app.
- Arrange the data so:
- Row 1 starts with
Roster, followed by a blank cell, then your dates across the columns. - Each following row has an optional shift group label, the time slot, then agent names across the date columns.
- Row 1 starts with
- Export or download the file as CSV (comma-separated values) — usually under File → Download → CSV or File → Save As → CSV.
INFO
Both .csv and .txt file formats are accepted.
Uploading the CSV File
- On the Import CSV Roster page, click the upload area (or tap Tap to upload CSV).
- Your device's file picker will open — navigate to and select your CSV file.
- Click Import (or submit the form) to begin processing.
📸 Screenshot: The upload area showing a dashed border and "Tap to upload CSV" label
A processing indicator will appear while the file is being imported — this may take a moment for large rosters.
What Happens During Import
Once you upload the file, the system processes every row:
- Agents found by name are matched to existing team members automatically.
- New agent names (ones not yet in the system) are created automatically with a generated colour. You can update their details — like holiday groups and days off — from the Agents page afterward.
- Each valid time slot + date + agent combination creates or updates a shift entry.
- Rows with missing or unreadable time slots are silently skipped (they don't cause an error).
When processing is complete, a success banner appears showing how many shift entries were imported:
✅ Imported 247 schedule entries.
📸 Screenshot: Green success banner showing the imported entry count
Handling Common Issues
| Problem | What to check |
|---|---|
| "The csv field is required" | Make sure you selected a file before submitting. |
| "Empty file" | Your CSV has no data rows. Check that the file exported correctly. |
| Fewer entries than expected | Some rows may have been skipped — check that time slots are on the hour (:00) and dates in the header row are readable. |
| Agent names not matching | Names in the CSV must match exactly what's in the system. A name typo creates a new agent instead of updating the existing one. |
WARNING
There is no rollback — if the import stops partway through due to an unexpected error, rows already processed will remain in the schedule. Re-running the import is safe because the system uses update-or-create logic.
After the Import
Once the import succeeds, head to these places to review and tidy up:
- Schedule view — open the schedule for the relevant dates to confirm shifts appear correctly.
- Agents page (
/agents) — check any auto-created agents and set their holiday group, days off, and avatar if needed.
TIP
If your agents have approved leaves or if your workspace has holidays configured, those settings aren't automatically applied during import. Check with your admin whether a leave sync is needed after a large import.
INFO
OT (overtime) status is not imported. All imported shifts come in as regular hours. If any of those hours were overtime in your spreadsheet, you'll need to mark them manually in the schedule.