Appearance
Profile Settings
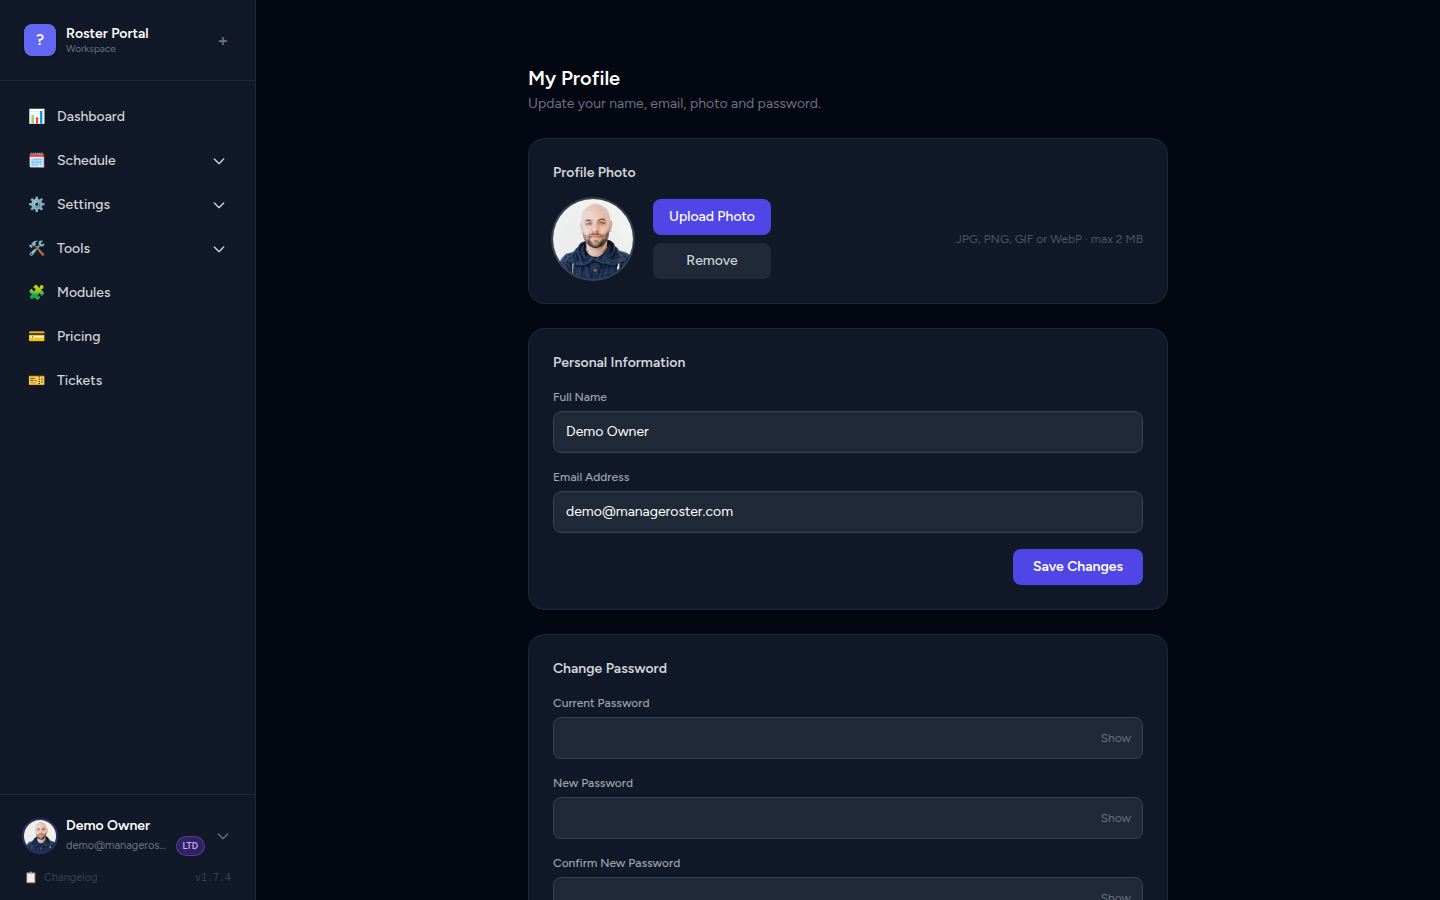
Your profile is how Manage Roster identifies you across the platform — your name, photo, and email appear in shift views, notifications, work reports, and audit logs. This guide walks you through every setting on the Profile page.
Navigating to Profile Settings
There are two ways to open your Profile Settings:
Option A — Avatar dropdown:
- Click your avatar or initials in the top-right corner of any page.
- Select Profile from the dropdown.
Option B — Sidebar:
- Open Settings from the left navigation.
- Click Profile.
📸 Screenshot: Top-right avatar dropdown showing "Profile" option highlighted
Uploading a Profile Photo
A profile photo helps teammates recognise you quickly in shift views, leave requests, and chat threads.
- On the Profile Settings page, click your current avatar (or the Upload Photo button below it).
- A file picker will open. Select a photo from your device.
- A preview of the new photo will appear.
- Click Save Changes to apply it.
Accepted formats: JPG, PNG, WebP
Maximum file size: 2 MB
📸 Screenshot: Profile page with the circular avatar upload area and "Upload Photo" button
Choose a clear headshot
Your photo is displayed at small sizes throughout the app. A clear, well-lit headshot with a plain background works best. Avoid group photos or images with text.
No photo? No problem
If you haven't uploaded a photo, the app will display your initials in a coloured circle as a placeholder. This is set automatically and looks perfectly fine.
Updating Your Display Name
Your display name appears throughout the app — in schedule views, the team member list, work reports, and activity logs.
- On the Profile Settings page, locate the Display Name field.
- Clear the current name and type your new one.
- Click Save Changes.
📸 Screenshot: Profile Settings form with the Display Name field highlighted
Use your full name
Use the name your team knows you by. It makes it easier for managers to find you in schedule views and approve your requests.
Updating Your Email Address
Your email address is used for login, system notifications, and invitation emails.
- On the Profile Settings page, find the Email Address field.
- Replace the current email with your new address.
- Click Save Changes.
What happens next: Manage Roster will send a verification email to your new address. You'll need to click the link in that email to confirm the change.
Use the new email to log in after verifying
Once you verify the new address, your login credentials will update automatically. From your next login onwards, use the new email address.
Verification required
The email change is not fully applied until you verify the new address. Until you click the verification link, your old email address remains active for login.
📸 Screenshot: Profile page email field with the "Save Changes" button, followed by a banner saying "Check your inbox to verify your new email"
Changing Your Password
- Scroll down to the Change Password section on the Profile Settings page.
- Enter your Current Password in the first field.
- Type your New Password in the second field (minimum 8 characters recommended).
- Re-enter the new password in the Confirm New Password field.
- Click Update Password (or Save Changes in this section).
📸 Screenshot: Change Password section with three fields: current password, new password, confirm password
Forgot your current password?
Your current password is required as a security check. If you've forgotten it, log out and use the Forgot Password link on the login page to reset it via email before attempting to change it here.
Use a strong, unique password
A strong password is at least 12 characters and includes a mix of uppercase letters, numbers, and symbols. Consider using a password manager.
Saving Changes
All profile changes take effect only after you click Save Changes. If you navigate away without saving, your edits will be lost.
📸 Screenshot: "Save Changes" button at the bottom of the Profile Settings form
Changes not showing?
Most updates apply immediately. If something doesn't refresh — like your name not updating in the top navigation bar — try a hard refresh:
- Windows/Linux:
Ctrl + Shift + R - macOS:
Cmd + Shift + R
Deleting Your Account
Danger Zone — this action is irreversible
Deleting your account permanently removes your login access, profile data, and personal information from Manage Roster. This cannot be undone.
If you're a workspace Owner, deleting your account will also affect your workspace. Contact Manage Roster support before proceeding to discuss what happens to your workspace and team's data.
To delete your account:
- Scroll to the bottom of the Profile Settings page.
- Click Delete Account in the Danger Zone section.
- A confirmation dialog will appear asking you to type your email address or confirm the action.
- Confirm the deletion.
📸 Screenshot: "Danger Zone" section at the bottom of Profile Settings, with a red "Delete Account" button
Consider removing yourself from workspaces first
If you belong to workspaces owned by others, removing yourself from those workspaces before deleting your account is good practice. Your agent profile (if you had one) will remain on those schedules for historical accuracy.
Next Steps
- Inviting Team Members — Add teammates to your workspace
- Managing Workspace Members — View and manage member roles
- Subscription Plans & Pricing — Manage your workspace plan